There is nothing as cheap as making a fitted diaper out fabrics lying around your house that are destined for the Goodwill. In fact, this project costs me only about $.50 a diaper to make and from it I get a great, quality, absorbent diaper!
What you will need:
1-2 T-shirts
About a yard of elastic (You won't actually use that much)
4 inches of touch tape hooks (I prefer 1.5" thick, but I've also used 3/4" thick)
about 1 foot of touch tape loops
Some ugly/old/even pretty wrapping paper (it makes great patterns if you're making your own)
A ball point needle on your sewing machine. Sharp needles will poke holes in your fabric.
A diaper pattern (I've linked you to some online patterns, but the one I use is my own)
Your pattern should include the diaper body and the insert/soaker pad. If it does not, making an insert is pretty easy. You can trace over one you already have, or you can do like I did and use the diaper body pattern to make a smaller, similarly shaped soaker. My soaker looks like an hour glass and is about 1.5 inches smaller all around than the diaper body. And, btw, wrapping paper is a great material for pattern making!
Instructions:
First, cut four of the diaper body and four of the insert/soaker layer. In order to make use of all my fabric, I folded my insert pattern and stuck it to the side of the T-shirts on the folds. This only made two soaker layers so I had to repeat on the other side to make four.
Next, pin your insert/absorbent layers together, and then zig zag stitch them in place. Because you're using a stretchy fabric (unless you've opted for some old flannel shirts or blankets instead of T-shirts) it is important for you not to pull the fabric through the machine. Let the machine move the insert along on it's own, and you can just guide it. Whenever you start or end a seam, remember to stitch backwards and forwards to anchor your stitch.
At this point you need to decide which T-shirt layer you will use for the visible outside of your diaper and which you will use for the visible inner layer. Then, set two layers aside, including the outside, visible layer, and grab the other two layers, including the visible, inner layer. T-shirts have lots of pretty patterns and colors and I always like to make the nicest parts face outward on the inside and the outside of my diaper.
Once you've decided which layer will be used for what, grab the two layers of the T-shirt that will be the inner layers. With the visible layer facing outward (or towards the table in this case) lay your insert in the diaper body layer, making sure it's centered. In other words, lay your insert against the wrong side of your two inner diaper layers. For this diaper, my inner visible layer was plain white.
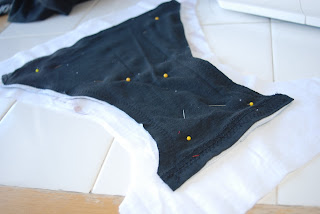
Now pin it in place, putting the pins out of the way of the sewing machine's foot.
Next, you will simply stitch this layer to your two diaper body layers. You can use a zig zag stitch or a straight stitch. Remember to anchor the stitch by stitching backwards and forwards at the beginning and end of your stitch. When you are done, your diaper will look like this on the good side. This is the side that will be visible on the inside of the diaper and against your baby's skin.
Now, cut two pieces of touch tape hooks. These will be the diaper closures.
Place them where you want them in the closure tabs on the GOOD SIDE of the inner diaper layer, like so.
Again, this is the side of the inner diaper layer that will be visible/against your child's skin. The insert you just sewed in will not be visible. You want to put the touch tape hooks tabs on this side.
Stitch them in place. I use a very slight zig zag stitch to add my touch tape because sometimes touch tape can pull apart with a straight stitch. You want to stitch close to the edge, but not too close. Remember to anchor your stitches at the beginning and the end. You can see where mine is anchored because the line is slightly thicker where my stitch started.
I wish I could take credit for the next part of this diaper, but I saw it on some pattern somewhere--probably one on zany zebra. I don't know if this is what the creator of the pattern intended, but this is what I got out of it and so this is how I make my diapers now. It saves a little bit of touch tape loops, which is good because I find that I need like five times as much loops as I need hooks--though some people say it's only three times as much.
Now, you're going to make flaps to cover the rough side of the touch tape (the loops) while the diaper is in the wash. I took the sleeve of one of my T-shirts, using the hem that's already sewn there rather than sewing my own hem. Use a sleeve that coordinates with the outside of your diaper as this flap will be visible on the outside when the diaper is worn. Next, I and placed the closure tab of my diaper on the sleeve, placed in a way that the velcro would be completely covered (see above picture). With the tab like so, I simply cut around the white fabric.
...and ended up with laundry flaps that look like this.
Now, in order to make the diaper more adjustable for babies with teeny, tiny waists (like my daughter), I like to add a bit of the touch tape loops to the outside of one of the tab closures. However, since I also want a laundry flap to be able to move from the outside to the inside of the diaper, I need to sew this strip of loops on BEFORE I sew the diaper together.
First, you want to place your laundry flaps right side out on the right side of the outer diaper layer like so:
Then, once you've decided which laundry flap will have your strip of touch tape loops, sew the loops on the way you sewed the hooks to the inside of the diaper on the closure tabs. Make sure to leave about 1/2 inch seam allowance on all sides, except for the hemmed side which won't be sewn down.
Now, it's time to align all the pieces and pin them together. First, place the laundry flaps right sides out on the right sides of the diaper. Next, place the inner layer that has the insert/soaker sewn in, against the outer diaper layer, right sides (visible sides) together.
Now, pin them, making sure that all the layers are lined up--especially in the curvy places and the corners.
Sew the layers together with a straight stitch leaving about 1/2" seam allowance (that's 1/2 inch between the edge of the fabric and your stitch)
Once the diaper layers are all sewn together, you can sew in your elastics. Yay!
Now, I'm sorry, but from this point on the photos will be of a couple of different diapers because I got so into sewing this one that I forgot to take pictures of the rest of the process!!! The next diaper I photographed is yellow on the outside and white on the inside with a yellow colored insert/soaker layer. The red you will see is an inner layer of fabric that won't be visible at all once the diaper is turned right side out.
I start sewing the elastics onto the diaper just after the the tab closure stops curving and then sew it the length of the leg between both the top and the bottom of the diaper, like so:
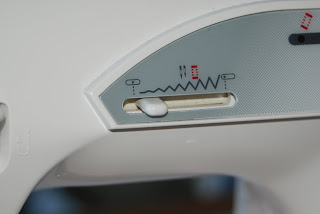
Set your machine to a zig zag stitch that will be the width of your elastic when stretched:
Then, set your stitch length to a short length like so:
Anchor the elastic by sewing backwards and forwards with the zig zag stitch set to a short length.
Then, once the elastic is anchored, you can lengthen your stitch:
...and sew your elastic onto the leg of your diaper. There is no need to pin your elastic. Once it's anchored you'll sew it by pulling the elastic taut while zig zag stitching along the length of the leg. I like to do this on the outside of the seam holding the layers of the diaper together.
If you need to see this done, check out this tutorial from diaperkit.com. (And then check out some of her great products!!!)
When your done, set your stitch back to a short length, and anchor it. Then, you can cut the rest of the elastic off.
After sewing the elastic into the first leg, go ahead and sew elastic into the second leg and finally into the back of your diaper. I always use the tab closures as a guide as to where to stop putting elastic in, but some diapers have even less than that length of elastic and they work just fine. Where you place your elastic is up to you and how your baby is built. Since my Bunny is kind of skinny, I like lots of elastic to pull the diaper close around her little limbs and back.
When you've put all three elastics in, your diaper should look like this:
Now, you're almost ready to turn the diaper right side out. First, you want to cut the excess fabric from around the seams on your tab closures so that they will turn out nice and square.
Go ahead and cut the excess fabric from the front of the diaper, and stop cutting just before you get to where your elastics start.
At this point, you are ready to turn the diaper right side out.
You should start with the closure tabs. Push them inside out and use your finger, a pencil, a ruler or your scissors (closed, of course) to turn out the corners.
Then, pull the closure tabs through the diaper...
...like so.
Now, it's time to close the open end. You'll do this with a topstitch through all the layers.
Fold your ends in about 1/2 inch and pin across the top of the diaper.
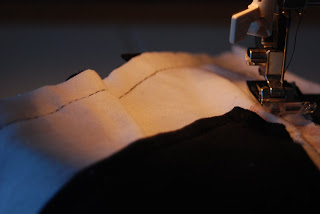
Then, top stitch through the layers. Because there are four layers, the ends will be VERY thick when closed and difficult to stitch through without material in front of or behind the foot to maneuver with your hands, so I start somewhere in the middle of the diaper and sew to the end (that way I have something to pull behind the machine), and then I turn it around and sew in the other direction through what is still open.
You'll need your longest strip of touch tape loops now. I cut it right then and there, leaving about an inch of space on either side of the diaper.
If you're going to add a size tag, the front of the diaper, against the touch tape is a great place to put it. I always take out the size tag and place it somewhere visible on my sewing table, or I'll forget to put it in all together. Actually, I only put it under the front strip of loops when I've forgotten to do so on the laundry flaps. I'm a TERRIBLY forgetful person so having TWO opportunities to add the tag is necessary for me. That way, if I forget to put it in the one place, I know I have one more opportunity to remember it without having to rip out stitches to sew it in.
So, this would have been a great place to put it had I remembered...
Like I did on this diaper.
Anyway, set your machine to a very slight zig zag stitch. The length of your stitch is up to you.
Sewing close to the edge, anchor your stitch at one end of the touch tape by sewing backwards and forwards a couple of stitches, and then carefully sew along the edge of the touch tape loops.
When you get around to the bottom stitch, stick your tag underneath where your will be sewing, in the middle of the front of your diaper.
And then continue to sew your seam.
And then your done! Yay! There's nothing better than completing a project and then having the chance to admire it and see that you've actually DONE it!!! This is what the inside of your diaper will look like.
...and here's the outside.
So pretty. I'm so very proud!

My favorite part is the text. "Parachuting is a high risk activity which may cause or result in serious injury or death." Teach 'em while they're young!!! T-shirts always make the most interesting diapers! My husband loves my diapers but he's always like, "Becca, they're so cute, it's such a shame to cover them up with the cover. You should make them waterproof." to the which I respond, "I'm not ready for that, Dave." Maybe one day. It's a cute idea!
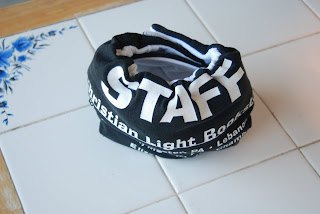
Here's the black T-shirt diaper from the first pictures.
With the closure tabs opened. I changed my pattern from this diaper to the yellow one so that the closure tabs are thicker and thus the laundry flaps are easier to use.
This T-shirt is pretty awesome too! My husband used to work for Creation Concerts and this was his STAFF T-shirt.
How to Use the Laundry Flaps
So, what are laundry flaps, you ask? Watch this:
1) Exposed hooks on diaper closure tabs.
2) Laundry flap on outside of diaper.
3) Laundry flap pulled over to the inside of diaper, now covering the hooks. I LOVE laundry flaps because they can't wear out like laundry tabs so often do! That stinkin little square of hooks will ALWAYS be covered in my wash and will never pop out and attach my other diapers like some of my favorite hooks and loops diapers do! AND... they make the diaper SLIGHTLY less expensive to make because it's just a little less loop tape to buy. Woo hoo!!!!
Show and Tell
Here's another diaper I'm pretty proud of.
The best part of this one is the velour inside, made from a pair of workout pants. Beware, velour is MUCH thicker than T-shirts and makes some of the sewing more difficult. My poor, cheap, little machine had a very hard time with the very last part of this diaper. If you make your diaper out of velour, you won't need as many layers as you do with the T-shirts.
Here are some other diapers I have made. Seriously, it's the pictures on the front of the T-shirts that make these diapers so interesting.
And for this one, I used red touch tape. Honestly, I only used red because it was all the one online store had in stock, so I bought it.
So, guys, now it's your turn.
and MAKE SOME YOURSELF!!!
If you find that any part of this tutorial is difficult, or that there are things lacking, or that I'm not clear enough in how I've worded things, I would be glad to add more to this post or clarify certain things and/or contact you personally with a solution. You can find my email at the top of my blog under "Contact Me"
Now, it's your turn.
Good luck!
You can do it!!!
Really you can! I believe in you!












9 comments:
ambitious! looks good! you need a serger :) you should sell stuff and earn the money that way- makes diaper making tons faster
I love the tab flaps idea! That is so awesome! I am going to have to find some our old t-shirts and try this. i love the ones you made, the shirts are great. lol :)
seriously. i'm just going to show up at your door one day and say: here. show me. :0) that is IF i knew where your door was. :0) great job, those are so fun!
ooak one of a kind- took me a while to figure that one out!
what fun! you inspire me to really learn how to sew.. i have the machine, just need the time and patience.!
~Ida Mae
http://www.treeswillbend.com
I LOVE them! I would love for my newborn to sport those...whoops I don't nor will have another newborn *tear*...Anywho...GREAT job!
this is a really great tutorial! thanks!
WOW!! I am amazed. Not sure if I could actually do it. But I may give it a try. Thanks a bunch!
Have you tried using PUL or Blackout Curtain fabric as an inner layer to make them waterproof/resistant?
Hobby Lobby carries the blackout fabric.
Post a Comment