Why I Choose to Use Cloth Diapers

Product Reviews


I'd love to review your products and help you spread the word about what you sell. Contact me at clothdiapermommy@yahoo.com if you have a product you'd like me to review and/or giveaway.

Wednesday, April 27, 2011

Busy, busy, busy!

It's happened again.  I have deadlines for way too many things all at once and my blog is suffering.  I have some custom wool soakers due the end of this week plus another wool soaker with  no deadline that really should be done soon; a video I'm making about flats for Diaper Junction also due, plus some writing I have to do for them; some school work that I don't normally have to take home with me; my sister's banquet gown that she needs in the middle of June, and she chose the most difficult pattern and fabric possible)...and I guess that's it.  But it's why I haven't posted. I'm so sorry!


I must say, though, I'm enjoying my flats a lot! Are you?  I find that handwashing flats is sort of easier than machine washing my pockets, prefolds, fitteds, (and yes flats) together in the washing machine because it really frees the machine up to do all the rest of the laundry! And yesterday, while my daughter played in the kiddie pool in our back yard, I sunned my diapers for the very first time on our drying rack (I still patiently await a clothesline) and the flats dried in under an hour with all the sun and the wind.  It was infinitely satisfying!

...and pardon our messy back yard.  It's our newest renovation project. 

Thursday, April 21, 2011

Handmade Easter Dress

A couple of weeks ago I found some pretty cream colored remnants on sale for a couple of cents apiece.  So I bought them with the intent of making Bunny an Easter dress.  Now, I could have done the easy thing and bought a pattern, or even found one online, but no, I decided to design my own.  The problem was, that Bunny was asleep and not only did I not want to wake her, but I've found it impossible to do any sewing when she is awake.  So I made the pattern using a dress she currently wears as a guide for size without being able to check it against her little body to see if it would fit.

The dress came out well, but has a couple of fit issues across the shoulders.  The semi-perfectionist in me isn't pleased about that, but the rest of me is proud at the finished product.  Coupled with a little, sweater shrug with 3/4 length sleeves, this will be darling on Easter Day!


Tuesday, April 19, 2011

Things I'm learning about Flat Diapers

I've been practicing for the Flats and Handwashing Challenge in my house.  I've been using the flats

1) If you accidentally forget to add night protection to a single flat diaper, your baby may wake up drenched in their own urine despite the amazing protection of a Thirsties Cover.

2) Handwashing flats regularly leads to some super dry skin, so stock up on the lotion!

3) Flats are very trim and make my daughter look so much smaller than what I'm accustomed to. 

4) Flats stretch out to a much larger size when line dried than they do when machine dried.  Plus, they have no wrinkles on the edges, leading to easier folding.

5) Not all folds are the same.  The origami fold may work well for one baby, but not another.

6) Flats, as well as many other fabrics, are stiffer when line dried and seem to be much more absorbent this way. 
7) Forgoing pockets and fitteds for flats induces an "Are you crazy???" look from my husband.

8) My daughter hates wearing flats because when I go to pin them (have I mentioned that I hate snappis?), my engagement ring pokes her.  I've started turning it around, but she's already got the flinching reflex from it :-(

9) I currently have only seven flats until my other ones arrive from Diaper Junction, but if I wash each flat as she dirties them it seems to keep more of them in circulation at a time.

10) Two line-dried flats "trifolded" into a Thirsties cover are very absorbent.  If I wanted to, I could let Bunny stay in them for a couple of hours but I do my best to change her right away no matter how little she's peed (She's a frequent wetter).

Monday, April 18, 2011

Is it Prefold or fitted???

One of my friends and I both sew cloth diapers.  She does them just for her son, and I do them, as you know, for friends, family, and My Etsy Shop

In any case, we've often given each other diapers--sometimes store bought, sometimes sewn.  It's sort of fun to obsess about cloth diapers with her occasionally, share our new CD discoveries, and show off the adorable little things we've been making lately.


A couple of months ago, she found a pattern online for this oddly shaped prefold.  I don't remember if the pattern called for elastics or if it's something she added herself.  But I do know that she tweaked the pattern to make it more form fitting and that some of this idea is all her own.  In any case, she made about five of them, and I would put the snaps on for her, since I have the Kamsnaps pliers and she won't ever need enough snaps to justify buying a set for herself.  Despite the fact that I didn't need to be compensated, she offered me one of these adorable diapers made out of the most luscious bamboo velour and I was so in love with it, I just couldn't refuse!  It's not only soft, gentle, and fitted, they also dry quickly because  it's made of only one layer! Best of both worlds!

Check it out:


In our house we use it both covered and uncovered; for night and day.  I think it's currently my favorite diaper! :-D

(Pardon the picture quality.  I find it hard to chase my daughter down these days and get a good shot from her because she just doesn't sit STILL for anything!)

Saturday, April 16, 2011

Cotton Babies Shares the Love

Jenn Labit over at Cotton Babies recently wrote a post about how you can cloth diaper your child for free or nearly free.  I'm sure it was helpful to many parents who are on a tight budget and struggle to get the diapers they need for their child.  I know I would have appreciated a post like that when I first started out with cloth, before I found my own ways to get diapers for free.


But she hasn't stopped there.  In addition to these helpful free diapering tips, Cotton Babies is now working towards starting a program that will give used cloth diapers to families who really need them.  If you or someone you know is struggling financially and can't get the cash together to get the cloth diapers they need, send them to this link to fill out the Spread the Love Survey.

Friday, April 15, 2011

The Flats and Handwashing Challenge!!!

Guys, you've probably heard about this already but I'm so SO excited to be a part of the Flats and Handwashing Challenge that Kim Rosas at Dirty Diaper Laundry is organizing!

”Dirty
The idea came to her shortly after the story came out about how families are reusing their disposable diapers in an effort to save money, which has caused life-threatening infections in some children.  (The link to that article is in the blog post she wrote that I linked above) She was trying to figure out a way that low-income families would be able to diaper their children for nearly free so as not to have to make the difficult decision between diapers and necessities like food and clothing.  But "just use cloth" is not necessarily an option since many of these families don't have their own washers and dryers.  Then she thought of flat diapers which was the diapering option for families before disposables and even before prefolds.  There are tons of different ways to fold them to customize fit and maximize absorbency, and they wash very easily since it is really just one layer of thin cotton with LOTS of surface area.  Which means that they also dry much more quickly than any other cloth diaper there is.  So, she decided that it would be the perfect cloth diaper for low income families.  But how to get the word out?  Easy! Ask us to join her in one week of committing to use only flat diapers and no more than 4 or 5 of our covers without the aid of the washing machine, dryer, or (winces) the diaper sprayer.  May23-30 is the designated week when we'll all be doing this.  So please, take the challenge with us.  This could open up so many doors to spreading the word and helping out families in need.

And for me, the challenge couldn't come at a better time! My friend just finished the first trimester of her second pregnancy and is cloth diapering her 1 1/2 year old.  She found that with her super smeller of a pregnant nose, that no matter how she washed and stripped her microfiber pockets and no matter how clean they were, she couldn't stand the smell of them.  She switched to flats and not only discovered the bothersome smell gone, but found out that washing them is a breeze.  After hearing her story, I gave a third cloth diapering friend who was part of the conversation a bunch of my flats to try, and gave my remaining flats a second chance (I'd tried them once before and hated them).  Upon using them again, I decided to go with pins rather than snappis (if you read my blog post about afixing snaps to prefolds, you know I'm not a big fan of the Snappi because of how it cuts into my daughter's bony, little hips).  With pins, I LOVED the flats! And I started using them coverless, and with wool, and once or twice with PUL covers.  I became a big fan of them a couple of weeks before this challenge so it really came at a good time! I probably wouldn't have considered joining the Flats challenge if I hadn't given my flats a second chance prior to hearing about it.

Anyway, stay tuned here and at The Cloth Diaper Blog where I will be posting about my preparations for the challenge, and my week long journey.  I will be using the seven flats that I already have and some flats that Bryana at Diaper Junction has generously told he she would send me to help me complete the challenge.  If you need flats yourself, go go on over to Diaper Junction and show them some shopping love so you can join this challenge too!  $15.95 for 12 smalls and $17.95 for 12 larges. Anyway, I hope to hear that you'll be joining me! Who knows you may find you like using flat diapers, and you may even discover that you'll gain the experience necessary to help a family in need some day. 

Tuesday, April 12, 2011

Bunny and the Remote

We don't let Bunny watch too much TV--not even a half hour a day, and we try not to let her watch it every day (unless she's really sick at which point we watch Sesame Street and/or Elmo a good deal) but my husband and I like TV so when she's sleeping, we'll put it on.  This means that when she wakes up she sees us pull the remote out and turn the TV off.  That, and one of the babysitters we had for awhile watched a lot of TV while babysitting Bunny and I didn't have the heart to tell her not to.  Anyway, this has lead to an adorable familiarity with the remote, as evidenced in the following, SUPER cute pictures:

 The best part is the little face she's making, like she's straining with ALL HER MIGHT!

Friday, April 8, 2011

Charlie Banana Cloth Diapers on Sale


Hey, if you're a cloth diapering fanatic like me, you may already know this but Charlie Banana's selling their OS cloth diapers for 14.99-15.99 a pop at Zulily (there are two prints left--robots and construction) and their six packs for only $74.99  Good deal.  Use this link to go over there and check it out. 

Thursday, April 7, 2011

Ah, the lilacs!


You don't know this about me but I have quite a fixation with lilacs.  We had beautiful, huge lilac bushes on either side of my house when I was a little girl and the two or three weeks that they were in bloom I would prance around the yard with armfuls of them pretending I was getting married or someone's flower girl.  In fact, I love lilacs so much that I planned my wedding around them.  I got married during lilac season so I could carry a bouquet of them.  Unfortunately, they bloomed early that year and I ended up with wilted lilacs for my pictures, but I wasn't really focused on my bouquet by that point :-D.


Way up north in Rochester, NY, they have a yearly Lilac Festival that I love going to despite the distance and I tried to go every few years until Bunny came into our lives.  While there I take a plethora of photographs of lilacs and I've started to make a little collection of lilac bushes--four in total now.


When my husband got a new job and we moved--leaving a parsonage for an apartment, my father-in-law graciously agreed to let our lilacs live in his yard for awhile.  We bought a house only a few months before Bunny was born and about a month too late to transplant lilacs.  The spring that followed was crazy busy and included me flat on my back for two or three weeks due to back problems so it just didn't happen.  But this year, finally, I will pine for my lilacs no longer because not only are all four bushes back in our yard where they belong, but now they're so much BIGGER than they were when we first got them and promise to yield lots and LOTS of blooms!!!

We planted them about two weeks ago and Bunny mostly just loved the wheel barrow so I took some pictures:


It's too early for them to bloom yet, but there are some exciting little buds that call to me every day when we go out to play.  I just can't WAIT until they flower and yield the most intoxicating and wonderful aromatic scent that God created on this beautiful earth!

Wednesday, April 6, 2011

Homemade Crayons

Bunny recently discovered coloring, thanks to an easel given to her as a Christmas gift by one of my sisters.  Mostly, she likes to watch me color her favorite Sesame Street characters, but she has also started scratching a crayon or two across the paper herself.  But I'm still concerned because the crayons--even the chunky ones--still make their way into her mouth.  What's worse, is that they break and then make their way into her mouth in nice, choke-able, pieces.

So I googled it and found instructions for making crayons.  Not that instructions would have been necessary, but it was nice to know that I wasn't going to set my kitchen on fire trying to make toddler friendly crayons.  I found some crayons in our basement--both Crayola and some cheaper crayons and we sorted them into a cupcake pan using cupcake papers as molds.

Then, I put them in the oven at 275 degrees.
I don't remember how long the instructions said to put the crayons in for--maybe 20 minutes--but it took much longer.  Nearly an hour if I remember correctly.

Once the crayons were melted--completely melted, I took some toothpicks and stirred the crayons up a bit to make sure the colors were even.

 Then, I let them harden for at least 24 hours before removing them from the molds, and gave them to my daughter--who called them "chocolate" because they resemble Reeses Peanut Butter Cups (which she'd only just tried the day before).


My one complaint about the crayons is that the color seeped to the bottom and colorless wax settled on top so only one side of the crayon colors really well.  My theory is that perhaps this wouldn't have happened if I would have used only high quality crayons.  Who knows.  In any case, Bunny loves them and they seem to be a good size and shape for her little hands.  And they haven't broken into choke-able pieces which is, really, my one concern.

Monday, April 4, 2011

Tutorial: Adding snaps (or velcro) to prefolds

I'm going to do my best to attempt a snapping prefold tutorial, so bear with me :-D  There are no patterns I feel I can give you here, because where you place your snaps (or velcro) depends on the size of your baby and how you fold your prefold.

First, you want to fold your prefold onto your baby using the fold you normally prefer to use.  This can work with the angel fold, twist, or the jelly roll.


Take a pencil and mark the place where the back of the diaper overlaps on the front of the diaper.  If you noticed, I simply marked a square on both places--that gives me an area where my closures can safely go.  (Don't worry, these markings should come out in the wash.  However, if for some reason they don't, no worries! You're kids gonna poop on them anyway ;-P) Notice, that since I'm putting this prefold on a baby with a smaller rise, the back is folded down.  If you have a bigger baby, then folding down in the back is not necessary.  (I've altered the following photos slightly so you can see my pencil marks better)

Within the squares I've drawn, I need to decide where my snaps will go.  I use snaps from Kamsnaps.com and attach them with a $27 pair of snap pliers which I love.  I love Kamsnaps, but I think other places sell snap pliers and snaps as well so you can shop around.  All that just to say, you don't have to break the bank getting an $80 snap press.   If I'm using velcro, then I'll simply attach squares of hooks to the back closures within the squares, and strips of loops to the front panels--only on the ends--within the squares.  With snaps, it's a bit more complicated since you need to measure to make sure that your snaps are all equidistant, but you're basically going to put your studs on the back flaps and your sockets on the front panel.

Once you've measured where your snaps will go, simply add your snaps.  Add the studs to the back and the sockets to the front.  I like to add a few more to the outer edge of the front panel to leave room for growth.

I also like to add some stud snaps facing the opposite direction so that when my baby gets taller, I can unfold the back flap and continue to use the prefold.  When I unfold it, the snaps facing the opposite direction turn away from baby's skin so they never dig in.  This also means that I can use the twist fold as another option.

Here's the prefold looking at it from both the back and the front once all the snaps are in their proper places.  If you click on the picture, you'll get a bigger view so you can investigate it more if you need to.


Here's the prefold snapped a couple of ways:
1. The Jelly Roll with the back flap unfolded


2. The Twist with the back flap unfolded:


3. Angel Fold with the back flap folded down:


4. Angel Fold with the back flap unfolded for taller babies:

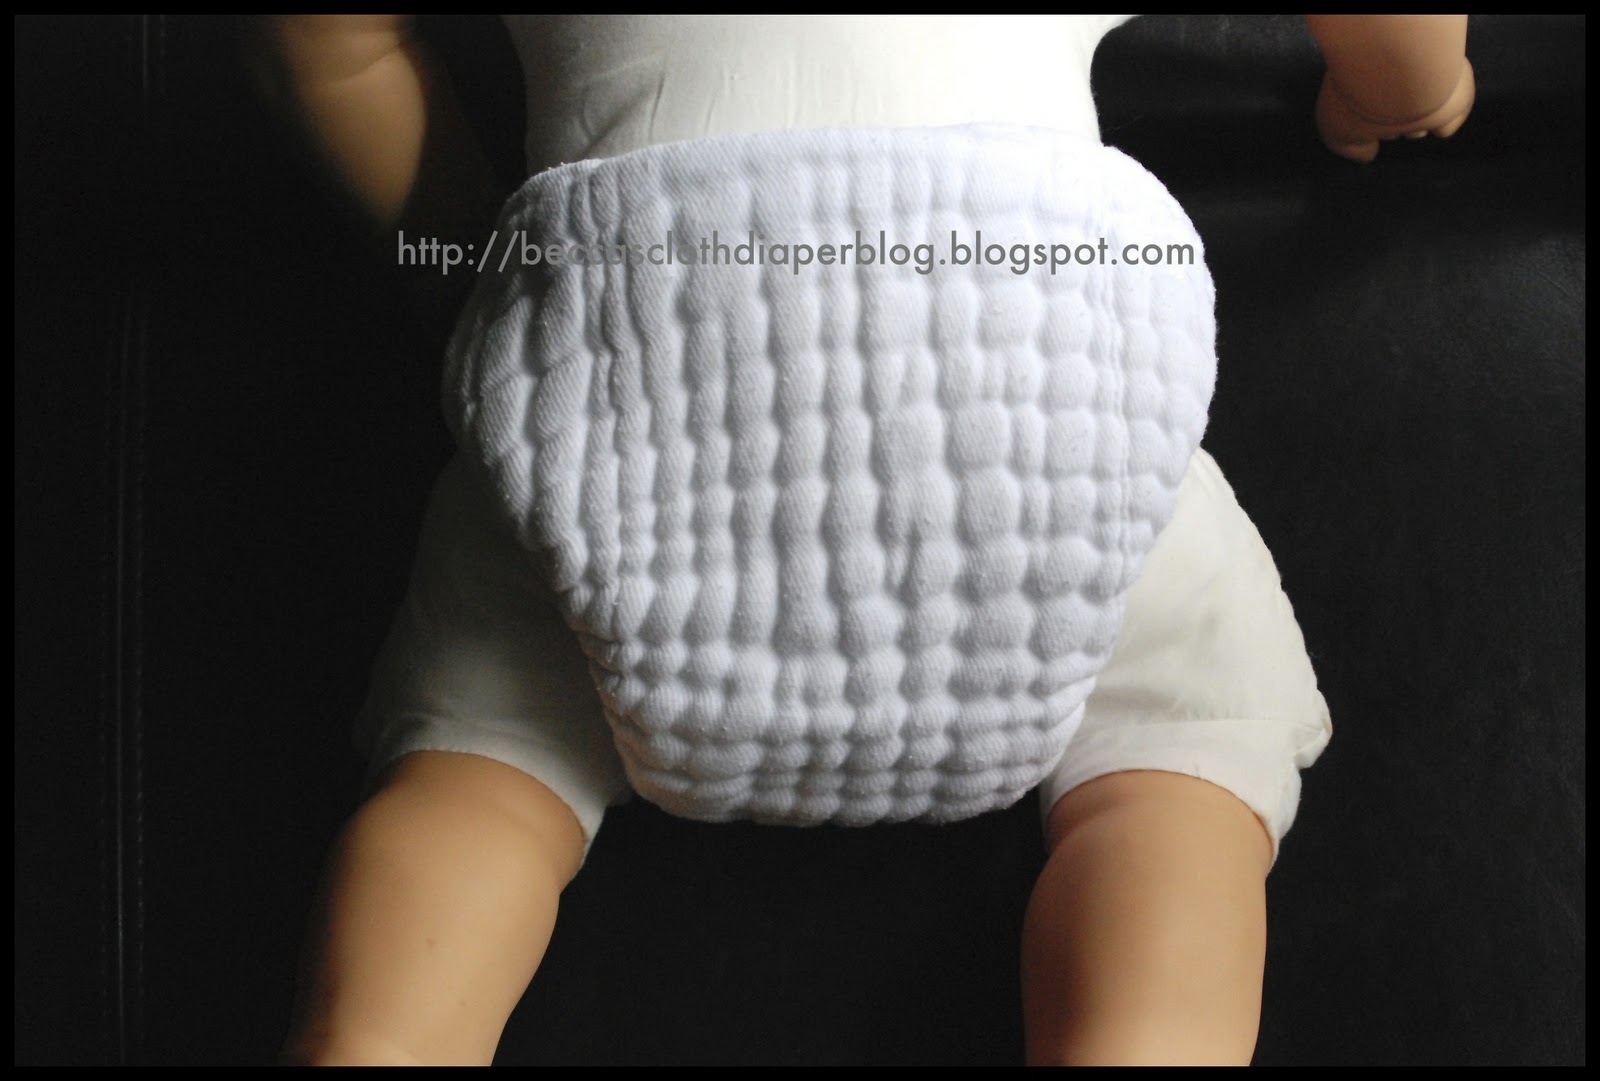
Here it is on Bunny:


If you want to try something really awesome, you can add elastics to get a tighter fit around the legs and contain the poop better.  I do this with the angel fold only.  You can either use another diaper to draw the elastic lines or you can fold the diaper the way you would with the angel fold and just draw a line along the fold that curves around the leg.  This is what the diaper will look like flat when the elastic is added:
Once the elastic is in, just fold like so, making sure to follow the line of the elastic, then pull the back sides out and snap it.

I don't have a picture of the snapped prefold with elastics on Bunny yet because she was napping when I took these pictures, but here it is modeled on her life sized baby doll who is about as big as she was when she was 6-9 months old.


So that's it! I hope you find this useful and easy to understand.  Let me know if there's something I can clarify for you!