I knew I could do it all along. But I didn't seriously consider cloth diapers for my daughter until after she was born, and honestly, I was in no condition to be worrying about my sewing machine. Newborns are exhausting and I was content to just shop with the click of the mouse rather than bending over patterns and a sewing machine during those few precious hours when she was asleep.
But now, she's four months old and she's a lot less dependent upon mommy and daddy to hold her constantly. She likes to play on her own in her high chair (which has yet to be used for eating) and on her play mat, or in her crib, and I have more time to do things with my hands, like sewing.
After reading an article on cloth diapering with recycled materials, I decided I'd make the cheapest one-sized pocket diaper ever by scrounging around my house to look for fabrics in clothing earmarked for the Goodwill.
Note: The following instructions are not comprehensive.
I found a polyester raincoat, a bunch of cotton T-shirts, a fleece sweater, and a microfiber car-washing cloth. I never ended up using the cotton t-shirts for this project but I will for projects in the future. (Check out the zany-zebra website if you're curious as to how)
There are a couple of free patterns available online if you search for them, but I wanted to make my own pattern. Eventually, though, I gave in and traced a couple of my cloth diapers and a disposable to get a pattern that I felt would work. I mean, you got to use those disposables for something, right? In any case, I'll still have to perfect the pattern and make it my own, but I just needed a starting point. (Looking back, I wish I'd just used one online as a starting point).
I had previously decided that I wouldn't buy a single thing to make these diapers, but when I didn't find a fabric around my house to go against my daughter's skin and wick away the moisture, I gave in and bought the fleece sweater from the thrift store down the street.
But as for the notions, I used left overs that were laying around gathering dust in my sewing box. It meant I ended up with mismatched snaps, but this diaper was just an experiment so matching snaps didn't matter much to me.
First, I needed to draft the pattern. I used a roll of wrapping paper I bought a couple of years ago from the dollar store and traced the different diapers on there. Then, I tweaked the pattern to my liking.

(This was not the pattern I ended up using, fyi)
Then, I cut the diaper shaped pieces out of my waterproof polyester (from the raincoat) and the fleece.
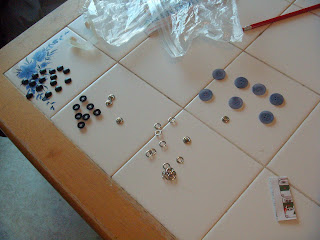
I took account of the different snaps I already had and laid them out on the cut piece of cloth to strategize where to place my snaps while my adorable daughter looked on.


When I'd decided the placement of the snaps, I hammered them in place using a mallet pilfered from my husband's tool bench.
I reinforced the fabric first, so that the snaps wouldn't pull holes when they were fastened and unfastened. I figured that two layers of the raincoat fabric would do.Since I made a one sized diaper, I put the rise snaps in as well, also using a second layer of the polyester to reinforce them. (Metal snaps are not recommended for diapers, btw. I just used them because they're what I had)

Next it was time to sew the elastics in the legs and waist. I measured my daughters adorable little thighs and then cut my elastic about two inches smaller. I practiced on a piece of scrap fabric first. With as much sewing as I've done, I managed to never zig zag stitch an elastic before. I was wondering why it wasn't working, but then I realized that I had a fancy stitch still on from when I made the baby wipes. Ooops!

I felt ready to sew on the diaper after my practice, so I sewed the leg elastic like so. I did the same with the elastic along the waist.
When the elastics were in place, I sewed the fleece lining in place and hemmed the open pocket edge. I didn't roll the hem but will do so in the future.
Next, I cut the corners off the edges so that my corners would be crisp when I turned the diaper out.
THen I turned the diaper out and sewed right along all the seams and around the elastics to make a nice, neat look.
I took my microfiber cloth and folded it in three, sewing around each edge just to keep it in place. I could have kept it un-sewn for better drying and for custom folding, but opted not to.
I stuffed the diaper and then stuffed my daughter into it.


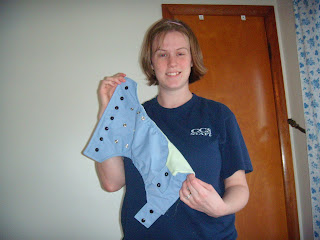
I made some adjustments by tightening the elastic in the back and adding leg gussets and the fit was much better:
I think my overall product is pretty cute!!!
However.... it occurred to me afterwards that the fleece I used as the lining had probably been washed many times in fabric softeners. This was confirmed when she leaked both times she used the diapers. I'm going to have to strip it to see if it's any good. If it isn't any good, that's okay. This project was less about making a usable diaper and more about seeing if I had the skills necessary to do so in the future. In short, it was practice.
I just went to Diapercuts and bought some fabrics to make my own diapers. Of all the fabric stores listed at the top of my page, hers was the one with the best end price (including shipping) and the best selection. A lot of the other places were sold out of what I wanted, and their end price was more expensive anyway. We'll see how Diapercuts ends up working out for me, but I was told by the owner of Diaperkits that she's a WAHM and a good friend, so I trust her!
Now that I've used garbage fabrics to make my diaper, you have no idea how excited I am to use the really good stuff!!!! I'll definitely keep you posted on further diaper making efforts! :-)


5 comments:
Congrats on your first diaper! I've been wanting to try my hand at making some too, so I was looking forward to seeing how yours turned out! What kind of raincoat did you use? Was it thick or more like a windbreaker, thinner material? I was considering trying to make my own swim diapers for this summer using a waterproof outer and some soft mesh for the inner lining (that's what Bummis Swimmis are lined with). By the way, I had to smile at the picture of your daughter facing away from the camera...my daughter is the same age and they both have that lovely little bald spot! Can't wait for that to fill in!!
Kayla, I couldn't even tell you what kind it was. It was thicker, but it wasn't that nylon, windbreaker stuff. If you want to use some sort of waterproof garment to make one I'd do a water test with it--see how waterproof it really is by dropping water on it, or in it, etc. I'm not an expert or anything, though.
Wow, I'm impressed!! Great job!!
I am so glad you shared the link for free cloth diaper patterns... I was looking into buying one! =) I'm still really nervous to try making my own, but I'm sure it will turn out just fine.
Great job!!
Wow! That is so cool that you made your first cloth diaper. You go mama! You did a great job :) If I could only be so brave and then I would need a sewing machine and know how to use it :)
very cute, it turned out great.
Post a Comment